
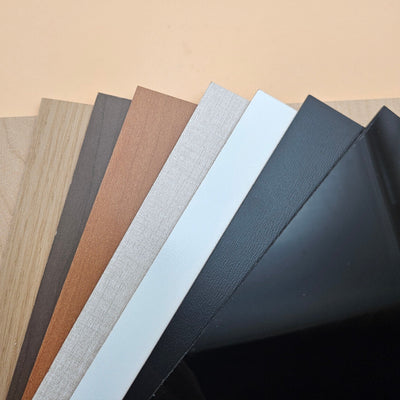


Two-tone acrylic: the complete guide
Updated Oct 2026TL;DR: Two-tone acrylic is a sheet with a thin coloured cap over a contrasting core. A light, fast laser engraving pass removes the cap and shows the core colour, so you get crisp two-colour text and artwork with no paint fill. Three-tone adds a middle layer: a light pass shows the middle colour, a heavier pass shows the core. Pick 1.5 mm for tags, keychains and ornaments, 3 mm for signs and plaques. Peel the film, engrave first, cut last, and always test on a scrap.
What two-tone acrylic is
Two-tone acrylic, also called engravable acrylic, colour core acrylic or laminate, is built in layers. A thin coloured surface layer, the cap, sits on top of a thicker core in a contrasting colour. The cap is a small fraction of a millimetre thick. Everything under it is the core.
When the laser engraves the surface, it removes the cap and exposes the core. A matte black sheet that engraves white gives you white text on black. A brushed gold sheet that engraves black gives you a black logo on gold, the classic award and nameplate look.
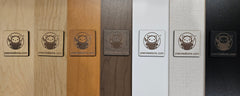
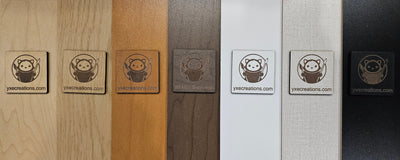
You can see the layers on the edge of a sheet. In the stack below, each 1.5 mm dark wood grain sheet shows a thin printed cap and a light core:

The cut edge of every piece shows the core colour too. On a purple sheet with a white core, every cut-out shape has a thin white rim. That rim is part of the look, so plan for it.

How the engrave works, and why depth matters
On standard cast acrylic, a laser engrave leaves a frosted white mark and you can push the depth a long way without ruining it. Two-tone is different. The goal is to remove the cap and stop. The core colour is already there; you only need to uncover it.

There are three outcomes:
- Too light. Some cap is left in the pocket. The engraved area looks patchy, speckled or muddy, especially on metallic and wood grain caps.
- Right. The cap is gone and the floor of the engrave is clean core colour. Edges of letters are sharp.
- Too deep. The laser keeps going into the core and melts it. Letters get soft edges, the floor can look glossy or hazy, and a raised lip can form along the edges.
That is why two-tone engraving uses much less power, or more speed, than frosting clear or coloured cast acrylic. If you run your usual acrylic engraving settings, expect the too-deep result.
Three-tone acrylic: two colours from one sheet
Three-tone acrylic adds a middle layer between the cap and the core. A white sheet that engraves red and black, for example, has a white cap, a red middle and a black core.
- A light pass removes only the cap and shows the middle colour.
- A heavier pass goes through the middle layer and shows the core.
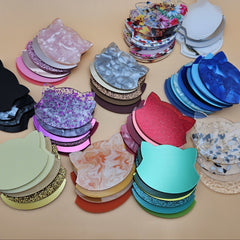
In your laser software, put the two depths on separate layers with their own power and speed, and run a test for each. The flamingo charm below is red three-tone: a light pass shows green, a heavier pass shows black, and the untouched surface stays red.

Our three-tone engravable acrylic comes in 1.5 mm. Most of the range is brushed chrome over two contrasting colours, plus white, red and brushed gold and bronze surfaces.
1.5 mm or 3 mm
| 1.5 mm | 3 mm (~1/8") | |
|---|---|---|
| Feel | Thin, light, slightly flexible | Rigid, solid in the hand |
| Best for | Keychains, earrings, ornaments, name badges, tags, labels, inlays | Door and room signs, desk nameplates, wall plaques, awards, standing signs |
| Cutting | Fast, fine detail cuts cleanly | Slower, needs more power for a clean edge |
| Watch for | Can bow; hold it flat on the bed | Heavier for hanging pieces |
| Available in | Two-tone and three-tone | Most two-tone colours |
Shop by thickness: 1.5 mm engravable acrylic or 3 mm engravable acrylic. The engrave settings for the cap are the same for both; only the cut settings change.
Sheet size, and what to do if your bed is 12 x 20"
Our engravable sheets are 30 x 60 cm, about 12 x 24". Many desktop diode and CO2 lasers have a work area around 12 x 20", so the sheet is about 4" too long to lie flat.
You do not need a saw. Score the sheet with a utility knife along a metal ruler and snap it over a table edge. You get a piece that fits your bed plus a 4" strip for small items and test squares. The full method is in How to cut acrylic without a laser: score and snap.
Finishes: bright, metallic and wood grain
Two-tone comes in three broad families, and they engrave a little differently.
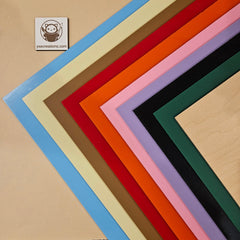
Bright and solid colours. Matte black, red, blue, green, purple, orange, rose pink and more, mostly engraving white. These are the most forgiving: the cap clears evenly and contrast is high. See bright colour engravable acrylic.
Metallic and brushed. Brushed gold, chrome, stainless steel, copper and matte silver or gold, mostly engraving black. This is the award and nameplate look. The metallic layer can need a touch more energy to clear completely; a pass that is slightly too light leaves a faint metallic haze in the letters. See metallic engravable acrylic.
Wood grain. Light oak, light wood, dark walnut, dark wood and ebony. You get the look of wood with the edge quality of acrylic. Dark grains engrave white with strong contrast; light oak engraves white with soft contrast, so it suits bold text better than fine detail. See wood grain engravable acrylic.


Picking a colour pair that reads well
The single biggest factor in how a finished piece looks is contrast between the surface and the core. High contrast reads from across a room. Low contrast looks elegant up close but fades at a distance and swallows fine detail.
The chart shows every two-tone colourway we stock, with the surface colour and the colour it engraves to. A rust dot marks the lower-contrast pairs.

Rules of thumb:
- Signs people read from a distance (door signs, wayfinding, room numbers): pick high contrast. Matte black engraving white, white engraving black, dark green engraving white, brushed chrome engraving black.
- Gifts and decor (ornaments, keepsakes): contrast matters less than mood. Brushed gold engraving red or white, light oak engraving white and rose pink engraving white all look good up close.
- Small text and fine line art: stay with high contrast and use a bold font. Thin script on a low-contrast pair disappears.
- Lower-contrast pairs are not a mistake, they are a style. Use larger, heavier lettering and check a sample before a big run.

How to engrave two-tone acrylic
Keep one scrap strip from every new colour as a test strip. A 1 x 4" offcut holds four or five test squares, and a test costs a minute instead of a sheet.
1. Peel the protective film from the face. Engrave and cut on the bare surface. Film left on can melt into the engraving and leave residue in the letters.
2. Hold the sheet flat. 1.5 mm sheets can bow slightly. Use hold-down pins, magnets or a few pieces of tape at the corners. A sheet that lifts in the middle sits out of focus there, and the engraving goes patchy in exactly that spot.
3. Set focus on the sheet surface. Focus on the top of the material, not the bed.
4. Engrave first, cut last. If you cut first, small parts can shift or drop on the honeycomb and the engraving lands in the wrong place. Put the engraving on its own layer and set it to run before the cut layer.
5. Use a light, fast fill engrave. You are removing a very thin layer. Start low on power and high on speed, then add power in small steps until the floor is clean.
6. Cut with your normal acrylic cut settings. The cap does not change how the sheet cuts. Use the same settings you use for plain acrylic of the same thickness.
7. Clean the engraving. Engraving leaves fine dust in the letters. Wipe with a soft cloth and water with a drop of dish soap, then dry. Avoid solvent cleaners and alcohol, which can craze acrylic.
CO2 starting points
These are starting points for a first test, not final settings. Every tube, lens and colour behaves a little differently, and metallic caps usually need slightly more energy than bright colours. Run a small grid (power across, speed down) on a scrap and pick the lightest setting that gives a clean floor.
| Engrave the cap | Cut 1.5 mm | Cut 3 mm | |
|---|---|---|---|
| 40 W CO2 | 300 to 400 mm/s, 12 to 18% power, 1 pass | 25 to 35 mm/s | 15 to 25 mm/s |
| 55 to 60 W CO2 | 400 to 500 mm/s, 10 to 15% power, 1 pass | Your 1.5 mm acrylic cut setting | Your 3 mm acrylic cut setting |
| Line interval | 0.08 to 0.1 mm (about 250 to 300 DPI) |
For machine-specific cut settings, check the YXE Creations Craft Hub laser settings database, which lists cast acrylic cut and engrave recipes for many CO2 machines. Cut speeds above come from our acrylic thickness guide.
Diode starting points (xTool S1 20 W)
A laser crafter tested our 1.5 mm two-tone on an xTool S1 20 W diode and shared their test cards:
| Sheet (1.5 mm) | Engrave | Cut |
|---|---|---|
| Brushed gold, engraves black | 500 mm/s, 50% power, 1 pass (200 mm/s, 50% for a deeper mark) | 10 mm/s, 90% power, 1 pass |
| Green, engraves white | 200 mm/s, 40% power, 120 lines per cm, 1 pass | 8 mm/s, 100% power, 4 passes |

xTool S1 20 W diode: engrave 350 to 600 mm/s, cut 6 to 10 mm/s.
White engraves red and white engraves blue have also been engraved and cut on a 10 W diode. 3 mm is a challenge for lower-power diodes, though our two-tone is more opaque than the regular cast acrylic we stock, which helps. Diode results still depend on the cap colour and your machine's power, so read Engraving two-tone acrylic on a diode laser for the full test cards and run your own before a real job.
Metallic caps and your laser head: shiny surfaces can reflect part of the beam back into the laser head and damage the lens or a diode module. Keep focus on the surface, keep the lid closed, check your machine's manual on reflective materials, and stop the job if you see the beam visibly reflecting.
Troubleshooting
| What you see | Likely cause | Fix |
|---|---|---|
| Patchy or speckled colour left in the letters | Not enough energy to clear the cap | Add 2 to 3% power, or slow down 10%. Metallic caps often need this. |
| Soft, rounded letter edges, glossy or hazy floor | Too much energy, engraving into the core | Drop power or raise speed until the floor is just clean |
| Raised ridge along the edges of letters | Melted core pushed up by an over-deep engrave | Less power; check that air assist is on but not blasting |
| Clean on one side of the sheet, patchy on the other | Sheet not flat, or bed not level, so focus changes | Hold the sheet down at the corners and middle; check bed level |
| Brown or yellow staining around the engraving | Smoke residue | Wipe with soapy water; make sure extraction is running |
| Residue stuck in the letters | Film left on during engraving | Peel the film before engraving |
| Three-tone shows the core when you wanted the middle | Light pass is too heavy | Lower power on the light layer and test both layers separately |
Design tips for two-tone
- Knock-out designs work well. Instead of engraving the text, engrave the background around it. The letters stay in the cap colour and stand out from the core-coloured field. This is a popular look for brushed gold and chrome nameplates.
- Use a frame. A thin engraved border 2 to 3 mm inside the cut line frames the piece and repeats the core colour of the edge.
- Mind the minimum line width. Very thin lines can close up or look broken. If a line is thinner than the gap between your scan lines, it may not engrave cleanly.
- Plan the edge. The cut edge always shows the core. On a brushed gold sheet that engraves black, every edge is a black line, which frames the piece nicely.
What to make with two-tone acrylic
Two-tone suits anything with text or a logo. The free generators on MyLaserTools export ready-to-cut files sized for these sheets:
- Keychains and tags: the layered keychain generator, license plate charm generator and symbol charm generator.
- Car charms: the hanging car charm with tassels generator.
- Signs: the desk sign generator and standing sign generator for table numbers, menus and business signs.
- Awards: the medal generator.
- Gifts and holidays: the gift tag generator and our free ornament generators.


Browse all two-tone and three-tone engravable acrylic at YXE Creations Craft Hub, in stock in Saskatoon.
Frequently asked questions
Q: What is two-tone acrylic? A: It is an acrylic sheet with a thin coloured cap layer over a core in a contrasting colour. Laser engraving removes the cap and shows the core, so text and artwork come out in a second colour without paint fill or masking.
Q: What is the difference between two-tone and three-tone acrylic? A: Two-tone has one cap over a core, so it engraves one contrast colour. Three-tone has a middle layer as well. A light pass shows the middle colour and a heavier pass shows the core, giving you two engraved colours plus the surface colour on one sheet.
Q: Why does my two-tone engraving look patchy? A: Some of the cap is left in the engraved area. Add a little power or slow down slightly, and check the sheet is flat and in focus. Metallic and brushed caps usually need a little more energy than bright solid colours.
Q: Why are my letters melted or soft at the edges? A: The engrave went too deep into the core. Two-tone needs far less energy than frosting regular acrylic. Lower the power or raise the speed until the floor of the engraving is just clean.
Q: Should I take the protective film off before engraving? A: Yes. Peel the film from the face before you engrave. Film left on can melt into the letters and leave residue.
Q: Should I engrave or cut first? A: Engrave first, cut last. Cutting first lets small parts shift or drop, which puts the engraving out of place.
Q: Can I use 1.5 mm two-tone for signs? A: For small labels and badges, yes. For door signs, desk nameplates and anything that stands on its own, 3 mm is stiffer and feels more solid.
Q: Will a 12 x 24" sheet fit my 12 x 20" laser? A: Not in one piece, but you can score and snap it to size in a couple of minutes with a utility knife and a ruler. See our score and snap guide.
Q: Can I engrave two-tone acrylic with a diode laser? A: Yes, for many colours. On an xTool S1 20 W, 1.5 mm brushed gold engraved at 500 mm/s and 50% and green at 200 mm/s and 40%, and both cut cleanly. White engraves red and white engraves blue have been engraved and cut on a 10 W diode. Results depend on cap colour and power, so read our diode guide and test first.