


Best adhesives for leatherette: which method for which job
Updated Jun 2026TL;DR: Our PU leatherette ships with built-in TPU melt adhesive on the back, so for most projects the answer is iron-on. For applications where you cannot use heat (acrylic substrates, tight curves, mixed materials), 3M double-sided tape from our tape collection is the choice. E6000 and contact cement remain useful for specific scenarios. Use this guide to pick the right method for each project.
Four adhesive methods that work
Each works on PU leatherette. They differ in how they cure, how they look, and how they hold.
Iron-on TPU melt adhesive (built into our leatherette). Every sheet we sell has a TPU (thermoplastic polyurethane) melt-adhesive layer on the back, protected by a release liner. The laser cuts through both the leatherette face and the TPU layer in a single pass, so weeded patches are immediately ready to iron onto fabric. This is the right default for hat patches, tags, applique, and anything else that bonds to a fabric substrate.
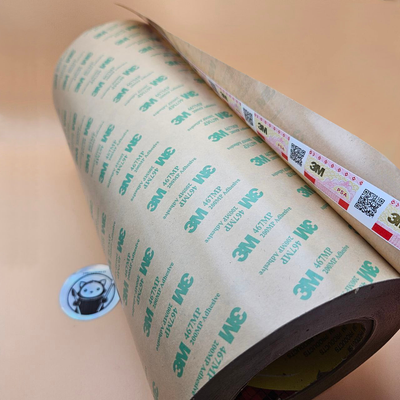
3M double-sided tape. A pre-applied, pressure-sensitive adhesive on a foam carrier. Peel, place, press. Right for when heat is not an option: acrylic substrates, painted surfaces, tight curves, or assembly batches where speed matters more than the iron step. See our 3M tape collection.
E6000. A solvent-cured industrial adhesive. Thick, slow to cure, very strong. Useful when bonding leatherette to non-fabric substrates (wood, acrylic, metal) where neither iron-on nor double-sided tape works. Available at most craft and hardware stores; not stocked by us.
Contact cement. A solvent-cured adhesive applied to both surfaces, flashed off until tacky, then pressed together. Bonds on contact, full strength in seconds. Useful for laminating full sheets of leatherette to felt, fabric, or a structural base.

When to use what
- Hat patches (cotton or poly twill, dad hats, snapbacks) → TPU iron-on (built in). Just cut, peel liner, iron. No tape purchase, no clamping.
- Iron-on appliques on shirts, bags, tote bags → TPU iron-on (built in). Same workflow as hat patches.
- Backpack tags onto woven backpacks → TPU iron-on (built in). Even an old polyester pack accepts TPU cleanly.
- Keychain blanks, two layers laminated → 3M tape or E6000. Both work; tape is cleaner and faster, E6000 is stronger for handled keychains.
- Bag bases, laminating leatherette to felt or fabric → contact cement. Even bond across the whole surface; iron-on works on small areas but a full bag base benefits from contact cement's flat bond.
- Patches on structured foam hats → TPU iron-on plus 3M tape backup. The iron may not get fully flat; a strip of 3M tape adds insurance.
- Leatherette on acrylic or wood → 3M tape or E6000. Iron-on does not work on rigid non-fabric substrates.
- Bookmarks, two-layer laminated → 3M tape. Thin, clean, no clamping.
- Earring backs, small flat parts → 3M tape or E6000. Tape for quick production, E6000 for one-offs where mess is fine.
TPU iron-on, in detail
For the workflow most YXE customers will use most often.
- Cut the patch on your laser. The TPU layer is cut at the same time as the leatherette; you do not need to do anything separately.
- Weed the offcuts (see our weeding guide).
- Wipe the substrate (the hat, shirt, or bag) with isopropyl alcohol to remove oils and softener residue.
- Peel the protective release liner off the back of the patch. The TPU is now exposed.
- Position the patch on the substrate. Lay parchment paper or a non-stick teflon sheet over the patch.
- Press a hot iron (medium-high, no steam) firmly down on the parchment for 12 to 18 seconds. Heat press at 130 to 150 C, 2 to 3 bar, for the same time.
- Lift the iron, leave the parchment in place, and let the patch cool fully (at least 60 seconds) before peeling the parchment off.
Cold wash and air dry preserves the bond for years.
For full detail and troubleshooting, see hat patches that actually adhere.
Heat plus pressure plus cool-down is the formula. If a bond fails, one of the three was wrong. Walk all three before changing materials.
3M tape, in detail
When iron-on is not an option. The 3M tape collection at YXE carries the variants suited to laser-craft work; ask if you are not sure which to pick.
How to use:
- Cut your leatherette pieces. Weed.
- Cut a strip of 3M tape just slightly smaller than the patch perimeter, so no tape extends past the edge.
- Peel one release liner. Stick to the back of the patch. Press firmly with a fingernail or roller to seat.
- Trim any tape overhang flush with a sharp craft knife.
- Peel the second release liner. Place the patch on the substrate. Press firmly for 10 seconds.
Tips:
- Surface prep matters more for tape than for iron-on. Wipe both surfaces with isopropyl alcohol. Skin oils and laser char dust dramatically reduce bond strength.
- For visible-face placements, use a transparent or matching-colour tape so the edge is not visible.
- Bond strength reaches full in 24 hours; usable immediately.
Shop the tape we recommend: 3M tape collection.
E6000, in detail
A versatile industrial adhesive sold at most hardware and craft stores in Canada. Use for leatherette-to-non-fabric joints.
How to use:
- Cut your parts and remove laser char dust.
- Apply a thin bead or small dots to one surface. Do not flood; excess oozes out the edges.
- Press the surfaces together firmly. Use clamps, weights, or binder clips for 30 minutes.
- Leave undisturbed for 24 hours for full strength.
Tips:
- Work in a ventilated space. E6000 smells strongly until cured.
- Clean tools with mineral spirits or acetone before the adhesive cures.
We do not currently stock E6000; pick it up at any local craft or hardware store.
Contact cement, in detail
For large-area laminating. Most useful when bonding leatherette to felt, fabric, or a structural base across the whole surface.
How to use:
- Apply a thin even coat to both surfaces with a foam roller, brush, or applicator pad.
- Let both surfaces flash off until tacky but not wet (5 to 15 minutes depending on humidity).
- Use a slip sheet (kraft paper, parchment) between the two surfaces so you can position.
- Pull the slip sheet out slowly while pressing the surfaces together from one end to the other.
- Roll the laminated surface with a rubber roller or rolling pin to expel air bubbles.
Tips:
- Solvent-based contact cements bond stronger than water-based. Use water-based when smell matters.
- Once bonded, you cannot re-position. Cut larger than your final size and trim after.
We do not currently stock contact cement; pick it up at any local hardware store.
Bonding gotchas
A few things that will ruin even a correct adhesive choice.
Iron-on TPU pros:
- Built into the leatherette we sell
- No separate purchase needed
- Fast workflow once iron is hot
- Bonds tight to most woven fabrics
Iron-on TPU cons:
- Needs heat (so not for plastic or painted substrates)
- Permanent (cannot remove without damage)
- Sensitive to wash temperature; hot wash will fail
3M tape pros:
- No heat needed
- Works on rigid substrates
- Fast to apply
3M tape cons:
- Visible at edges if not trimmed flush
- Adds material cost per piece
- Surface prep is non-negotiable
E6000 pros:
- Bonds almost anything to anything
- Stays slightly flexible after cure
- Cheap per joint
E6000 cons:
- 24 hour cure time
- Messy
- Strong solvent smell
- Visible bead at the joint
Contact cement pros:
- Best for large-area laminating
- Bonds on contact
- Strong bond
Contact cement cons:
- One-shot positioning
- Solvent smell, needs ventilation
- Brushing or rolling step adds prep time
Common bonding problems
Laser char dust on the bonding surface. Wipe both surfaces with a dry cloth or a quick alcohol wipe before bonding (iron-on tolerates this; tape and glues require it).
Face vs back side. The TPU adhesive is on the back of the leatherette. For visible-face bonds (rare; usually you bond the back), use 3M tape on the visible face.
Cold parts. Iron-on, tape, and glues all bond faster at room temperature. Warm parts up if your shop is cold.
Too much adhesive. All four methods above are stronger with less than with more. A thick bead is a weak joint because adhesives are stronger at thin even thicknesses.
Mismatched flex. Bonding a stretchy piece to a stiff piece creates stress at the joint that any adhesive eventually fails. Pair similar-flex materials.
Frequently asked questions
Q: Why does YXE leatherette come with TPU adhesive built in? A: It eliminates a step for most customers. Hat patches, tags, applique, and iron-on transfers are the most common uses, and they all need a melt adhesive layer on the back. Building it in means you do not have to buy and apply transfer adhesive yourself.
Q: Can I use the TPU layer to bond to plastic or wood? A: No. TPU melt adhesive needs heat to activate, and most plastic substrates either melt or scorch at TPU's activation temperature. Use 3M tape (cold) or E6000 (slow cure) for those substrates.
Q: My hat patch peels in the wash. What went wrong? A: Almost always one of: heat too low, pressure too low, or wash temperature too high after application. See the full hat patches that actually adhere guide for the troubleshooting walkthrough.
Q: Can I iron-on leatherette twice (re-position after first iron)? A: Once cool, the bond is permanent. If you peel up and try again, the TPU is already partly consumed and the second bond is weaker. Get the placement right the first time; mark with chalk before pressing.
Q: Why not just use 3M tape on every leatherette project? A: For fabric substrates, iron-on is faster (no peel-and-stick step) and the bond survives wash cycles better. For rigid substrates, tape is the right tool. The materials we sell are optimised for iron-on because that is what crafters need most often.
Q: Does the TPU adhesive work after the leatherette has been stored for a year? A: Yes, assuming the release liner is intact and the storage was not extreme (under 30 C, no direct sun). TPU shelf life is several years.
Q: Can I sew through TPU-backed leatherette? A: Yes. The TPU layer is thin and sews like the leatherette face. Use a slightly larger needle (90/14 or 100/16) if your machine struggles.